

Wednesday, October 19, 2011
WIP: Hyenas
Illustration that I have been working on. Inspired by Beyonce's "Run the World (Girls)" and the hyena men series. I don't usually draw creatures/animals in general, so I had to step out of the comfort zone to get the hyenas right (always good to be out of the comfort zone). Overall, satisfied with how the hyenas came out. Finished product coming soon!

Sunday, October 9, 2011
Some comic strips
Some random comic strips I draw in between my illustrations to hold off my viewers... my next illustration work in progress coming soon!


Friday, September 30, 2011
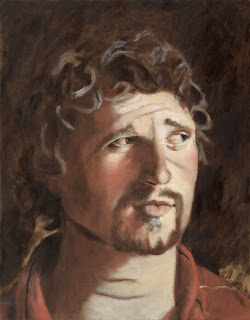
Oil Painting - Adjustment Phase
The final phase for the painting would be the adjustment phase, which basically is the fine tuning of the painting after completing the color phase. Most of the heavy lifting should have been done in the underpainting phase.
Ironically, the final adjustments actually took longer than the color phase, probably because as the artist you may never really feel that the painting is ever complete. But there is the point where you end up over painting, which is also the point where you want to stop.
First focus here is to emphasis the cooler planes so that the planes that are supposed to recede back into the background are doing just that. Then, there should be some further emphasis on the light effect to ensure that the viewer knows where the light hits the face.
Also, some additional work was done to the background to ensure that it is knocked back and remains the background, so that it does not interfere with the main subject of the painting.
Some additional work was done in the eye area, but that may not show up in the scan. Some more tweaks to the hair to make it look more lively, and additional work was applied to the creases within the shirt of the subject.
After some other minor tweaking, the final result is the painting that you see below.

Wednesday, September 21, 2011
Oil Painting - Color phase
Now we will move onto the color phase, where the color will be applied over the top of the underpainting.
The main goal of this phase would be to lay in the color. The final touch ups and wrapping up the painting will occur in the next phase.
The main goal of this phase would be to lay in the color. The final touch ups and wrapping up the painting will occur in the next phase.
To start off, the canvas gets oiled in, so that the original colors get brought back out. This is done because the paint should be dry from the previous underpainting phase. Once that oils seep in, it is time to apply the colors.
For this painting, I put in more reds for the darker portion, applied where the shadows are, with the exception of the hair. For the lights, a flesh tone is used, with a mix of yellow ochre. There is also some whites applied here, to reduce saturation and to create a light tone in the paniting. Going back and forth from darks and the lights, the color slowly is apparent.
Despite the application of colors to move the painting towards complete, there is still a heavy emphasis on making sure that the area where the light hits the face is. This is achieved with the mix of flesh tone that I use.
Finally some color is applied to the eye. A purplish mix is applied to the eyes, as the model here has blue eyes. Obviously this is very subtle, and probably will not show up in the thumbnail below.
Once the color has been applied to the underpainting, we have the below result.
Sunday, September 18, 2011

Monday, September 12, 2011
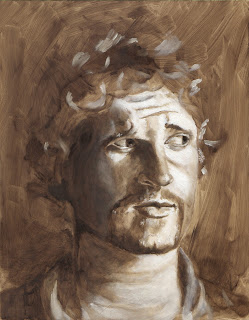
Oil Painting - Underpainting part 2
Second part of the underpainting process. I basically redid all of the steps as illustrated by the first part. However, redoing a painting was a helpful process, as I know was a bit more comfortable with the feeling of the paint, as well as how the brush and paints would react with the turpenoid. I was able to be a lot thinner in regards to the paint, and in turn got a more solid painting. Considering I would be painting the colors over this underpainting, it would be useful to keep the underpainting fairly thin when possible.
Also paid extra attention to the anatomy this time around. As demonstrated by the picture below, the results could be drastically different as a result.

Also paid extra attention to the anatomy this time around. As demonstrated by the picture below, the results could be drastically different as a result.

Wednesday, July 27, 2011

Monday, June 20, 2011
Oil Painting - Underpainting phase
Now come the underpainting phase. There were actually two attempts at this, as part of the assignment was to improve and build upon the initial underpainting. First the initial underpainting. After transferring the pencil drawing onto the canvas here (pre gesso-ed), I would apply a quick underpainting layer to the entire painting. What you are seeing here is burnt umber? With turpenoid to create a very thin layer of paint.
Once that is done, the actual underpainting phase begins. First, the darkest points are identified and marked with the raw umber. Next, the shadow area is defined. The shadow pass is relatively thin. Next is the light phase, where a lighter tone of the raw umber is applied. Paint is thicker in this case.
Going back and forth the dark and light phase, the painting slowly emerges. I will then apply some white mixed with the raw umber for even lighter tones. Once that is done, I will apply some pure whites to really show the light hitting the face.
After some back and forth of dark phases and applying white on portions of the face where the light is the strongest, I came to the first underpainting:
Friday, April 1, 2011
Oil painting - Sketch phase
This blog has been a bit lacking in the explanation department, so starting with this post I will start detailing a bit more of my process.
Starting off would be the below painting that I did for a class, link Tom fluharty class.
The painting was divided into 4 parts: the drawing phase, the underpainting phase, color phase and the adjustment phase.
Starting with the drawing phase, the goal was to capture the likeness of the below picture on paper to transfer to the board.
I focused a lot on structure for this phase, as I know I was still lacking in some departments in terms of structure. Overall fairly happy with the results, though the eyes still come difficult for me.

Ultimately the focus on structure caused me to overlook some of the tones, which I eventually revised.

More to come in the underpainting phase.
Starting off would be the below painting that I did for a class, link Tom fluharty class.
The painting was divided into 4 parts: the drawing phase, the underpainting phase, color phase and the adjustment phase.
Starting with the drawing phase, the goal was to capture the likeness of the below picture on paper to transfer to the board.
I focused a lot on structure for this phase, as I know I was still lacking in some departments in terms of structure. Overall fairly happy with the results, though the eyes still come difficult for me.
Ultimately the focus on structure caused me to overlook some of the tones, which I eventually revised.
More to come in the underpainting phase.
Subscribe to:
Posts (Atom)