

Wednesday, July 27, 2011
Monday, June 20, 2011
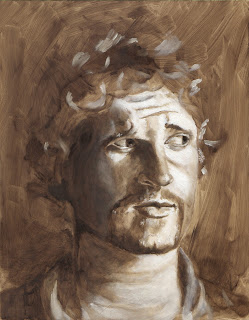
Oil Painting - Underpainting phase
Now come the underpainting phase. There were actually two attempts at this, as part of the assignment was to improve and build upon the initial underpainting. First the initial underpainting. After transferring the pencil drawing onto the canvas here (pre gesso-ed), I would apply a quick underpainting layer to the entire painting. What you are seeing here is burnt umber? With turpenoid to create a very thin layer of paint.
Once that is done, the actual underpainting phase begins. First, the darkest points are identified and marked with the raw umber. Next, the shadow area is defined. The shadow pass is relatively thin. Next is the light phase, where a lighter tone of the raw umber is applied. Paint is thicker in this case.
Going back and forth the dark and light phase, the painting slowly emerges. I will then apply some white mixed with the raw umber for even lighter tones. Once that is done, I will apply some pure whites to really show the light hitting the face.
After some back and forth of dark phases and applying white on portions of the face where the light is the strongest, I came to the first underpainting:
Friday, April 1, 2011
Oil painting - Sketch phase
This blog has been a bit lacking in the explanation department, so starting with this post I will start detailing a bit more of my process.
Starting off would be the below painting that I did for a class, link Tom fluharty class.
The painting was divided into 4 parts: the drawing phase, the underpainting phase, color phase and the adjustment phase.
Starting with the drawing phase, the goal was to capture the likeness of the below picture on paper to transfer to the board.
I focused a lot on structure for this phase, as I know I was still lacking in some departments in terms of structure. Overall fairly happy with the results, though the eyes still come difficult for me.

Ultimately the focus on structure caused me to overlook some of the tones, which I eventually revised.

More to come in the underpainting phase.
Starting off would be the below painting that I did for a class, link Tom fluharty class.
The painting was divided into 4 parts: the drawing phase, the underpainting phase, color phase and the adjustment phase.
Starting with the drawing phase, the goal was to capture the likeness of the below picture on paper to transfer to the board.
I focused a lot on structure for this phase, as I know I was still lacking in some departments in terms of structure. Overall fairly happy with the results, though the eyes still come difficult for me.
Ultimately the focus on structure caused me to overlook some of the tones, which I eventually revised.
More to come in the underpainting phase.
Friday, October 22, 2010

Monday, October 11, 2010

Thursday, October 7, 2010
Bottoms Up...

Inspired by Trey Songz's video for "Bottoms Up", except I made the video vixen a puppet instead.
Thursday, September 16, 2010
This DJ, she gets down...

DJ picture that I made for a friend... not happy about the coloring, but that will come with practice.
Update on the bear picture as well:

Added some rim lighting. What a little bit of lighting adjustment can do for a picture.
Subscribe to:
Posts (Atom)